Remodeling. Entry Grade 1/144 Hi Nu Gundam Ver. Full images, info and credits
I remodeled the entry grade Nu Gundam to make it a high new Gundam color. Citadel color brush painting. I tried to repair it with RG in mind such as the face. Hand parts use builder parts. The eye and chest sensors are some self-made decals such as 100% rappy tape and the unicorn mark on the shield.
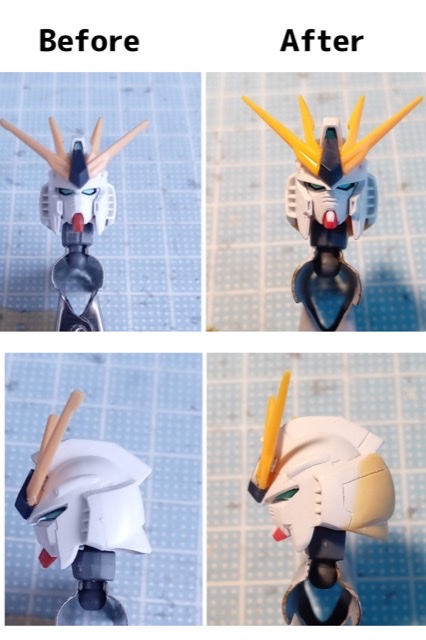
The head has been remodeled to look like RG’s ν Gundam. Volume up on the back of the head, stuff the top of the eyes, put a plastic bun on the top and cut the bottom. Also, although it is not shown in this image, I fill the side of the long eyes with a plastic stick and fill around the eyes with putty about 0.5.
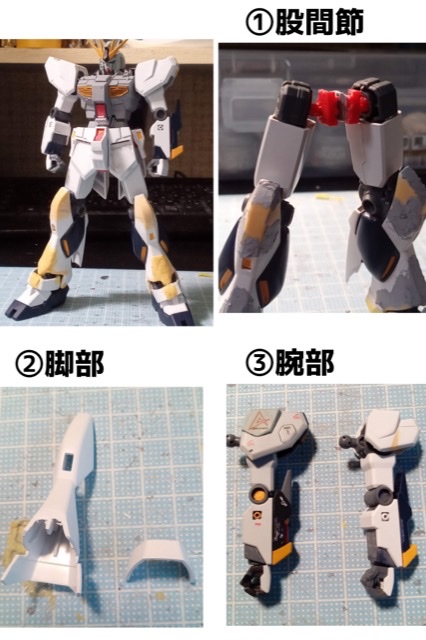
(1) Compare the style with RG and repair the width of the hip joint and the vertical position. Cut the crotch shaft in half and amplify it with a 3 mm plastic van in between. The height is a little less than 2 mm.
(2) I didn’t like the boot cut on the legs, so I cut it and lined it with epoxy putty to eliminate the spread. The cut parts are also disassembled into two parts, widened and reconnected. Changed to RG-like feeling. I try to make the feeling of hanging under my knees upward with epoxy putty.
③ For the arm, I scraped off the wrist and cut the armor a little, aiming for thinning. I also wanted to make the shoulder armor a little smaller, so I cut it vertically and reconnected it with epoxy putty. It is a paragraph so that it will be a stage like a high new.
I felt that the cockpit area on the chest was clogged, so I cut it. I wanted to narrow the width of the chest, but I gave up thinking that I couldn’t do it with my own skills, and I thought it would be a little better to scrape the armpits. Also, I attached fins to the chest duct with a plastic van. It feels like it’s plugged into a groove. There is too much space at the top, so I’m sticking it properly
For the shield, cut the protrusion at the top of the surface, cover it with a plastic van, and add a plastic rod at the bottom.
Details are added to the side surface with a plastic van. I didn’t like the upper part of the back side being open, so I put a lid on it with a plastic van. The details are like that.
The shield attachment has also been remade to be movable. (1) Cut (2) Put an appropriate poly cap between plastic vans, and attach the cut surface to the plastic van for reinforcement and grounding surface UP. ③ Since the shaft is short, it can be extended with a runner. Since there is no brass wire, I cut the needle part of the thumbtack and smash it. ④ It looks good and is completed. Since the shaft can be tilted to the left and right, the shield can be laid down even if the elbow is bent.
This entry grade ν Gundam is the second one, and the previous one was like a little remodeling without spending time.
Thank you for watching until the end! Somehow the pose of the beam saber was taken cooler than the rifle equipment.
Work by @MADxkyo on Twitter